 Wiki
This chapter covers the complete XGO-Duck audio/video kit. Use the audio/video App package, version 0.3.6 or later (App package or precompiled .ard). For the full setup sequence, start with 01 · Check the kit and print the parts.
Stop motion and support the robot before inspecting its mechanism. Power off before changing connectors. Avoid stalled servos, and stop testing if a joint becomes unusually hot or the power supply is unstable.
For software installation or diagnosis, the installation assistant form can prepare a connection prompt for Codex, DeepSeek Harness or Cursor. Keep the relevant error log so the assistant can investigate the actual failure.
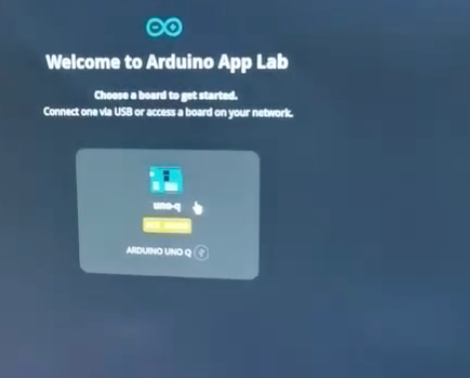
1. App Lab does not show the device
Connect the computer to Arduino UNO Q with a USB-C data cable. A charging-only cable will not work.
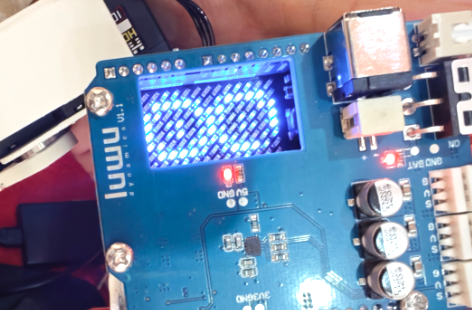
Allow about one minute for the board to start. The LED matrix shows a blue animation during startup; the animation stops after a successful boot.
If the blue animation keeps repeating, the board may be restarting continuously. Power off, remove the expansion board, then connect UNO Q alone to the computer and check whether it starts normally.
If UNO Q still restarts when connected on its own, disconnect all power and check for a short between the two points marked in the photo below. A short at these points indicates a possible board fault; stop testing and report the result.
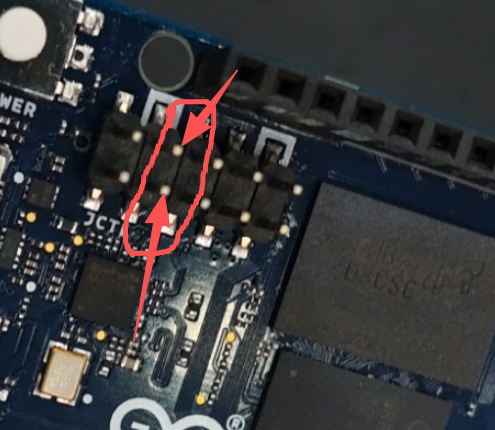
Checking the marked pins for a short circuit
Disconnect USB, the battery and every other power source before measuring.
Procedure: select continuity mode, touch the probes to the two points marked in the photo, record the reading, then swap the probes and check again. Keep each probe tip clear of adjacent pins.
Normal result: at these two marked test points, OL in both probe directions is the normal result for this check.
Impacts during rolling, falling or getting up can damage the board. Fit the protective shell that matches your expansion board version before testing these actions.
2. The robot sways or shakes
The cockpit and the :9527 motion-control page provide help for unstable walking. Stop movement, support the robot and unload the servos before checking the mechanism.
Use the Single-servo installation check diagrams in Servo setup to check every servo's ID, position and installation order. Inspect the servo horns and mounting screws for looseness.
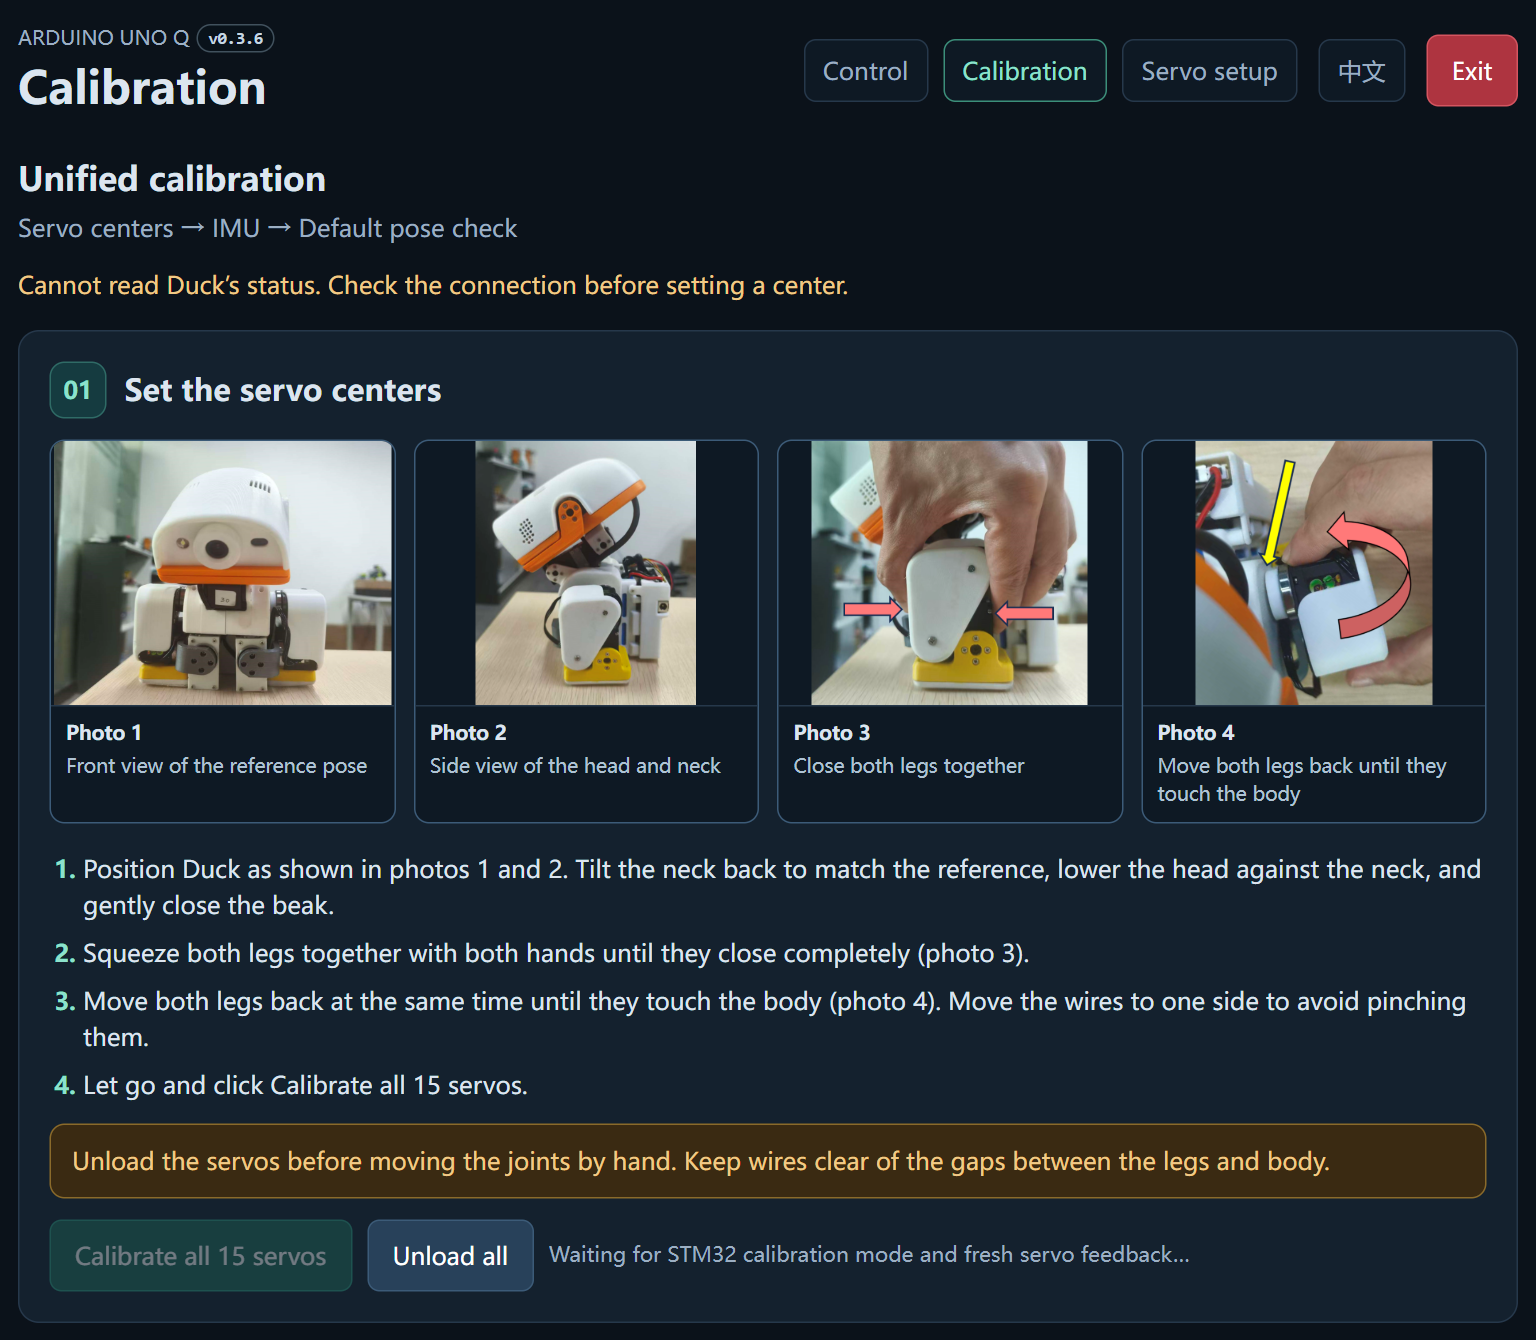
Follow 06 · Calibrate and take the first steps: match the four reference photos and calibrate all 15 servo centers together (including ID 30), then calibrate the IMU and check Default pose at the bottom of Calibration.
Open Servo setup, scan every ID, and set KP = 5 and KD = 10 on each servo. Write the settings, read them back, and check both stored and runtime values. Restart the robot after changing the gains.
3. The robot cannot stand up in Default Pose
Running from the charger: the 2 A charger cannot supply enough current for the robot to stand up. Charge the battery and use it for the movement test.
Running from the battery: check the battery charge, fully charge it, then try again.
Keep the robot switched off while charging. Check that voltage/current protection is enabled and the servo current limit is set to 2 A.
4. App Lab shows the device, but selecting it does not connect
Check whether 360 Security or other security software is blocking App Lab's connection. Temporarily pause the blocking protection to test, then re-enable it and allow the trusted App Lab connection if needed.
5. The App fails to start, or its web page does not open
Use Codex or DeepSeek Harness to inspect the App status and error logs. Fill in the placeholders in this prompt, or use the installation assistant form.
Board IP: [enter the current IP address]
SSH username: [enter the username, usually arduino]
SSH password: [enter the board's Linux login password]

Please check why the XGO Duck AI App is not starting correctly,
and inspect the relevant error logs.
Official English documentation:
https://github.com/LuwuDynamics/xgoduck_runtime_arduino/blob/ai-chat-audio-video-tof/README.md

What happens: [describe the issue]
Other errors or symptoms: [add details]
6. How is the calibration pose different from Default Pose?
Calibration pose in 0.3.5 and earlier: align the joints vertically or horizontally as shown by each calibration diagram. These alignments define the joint centers.
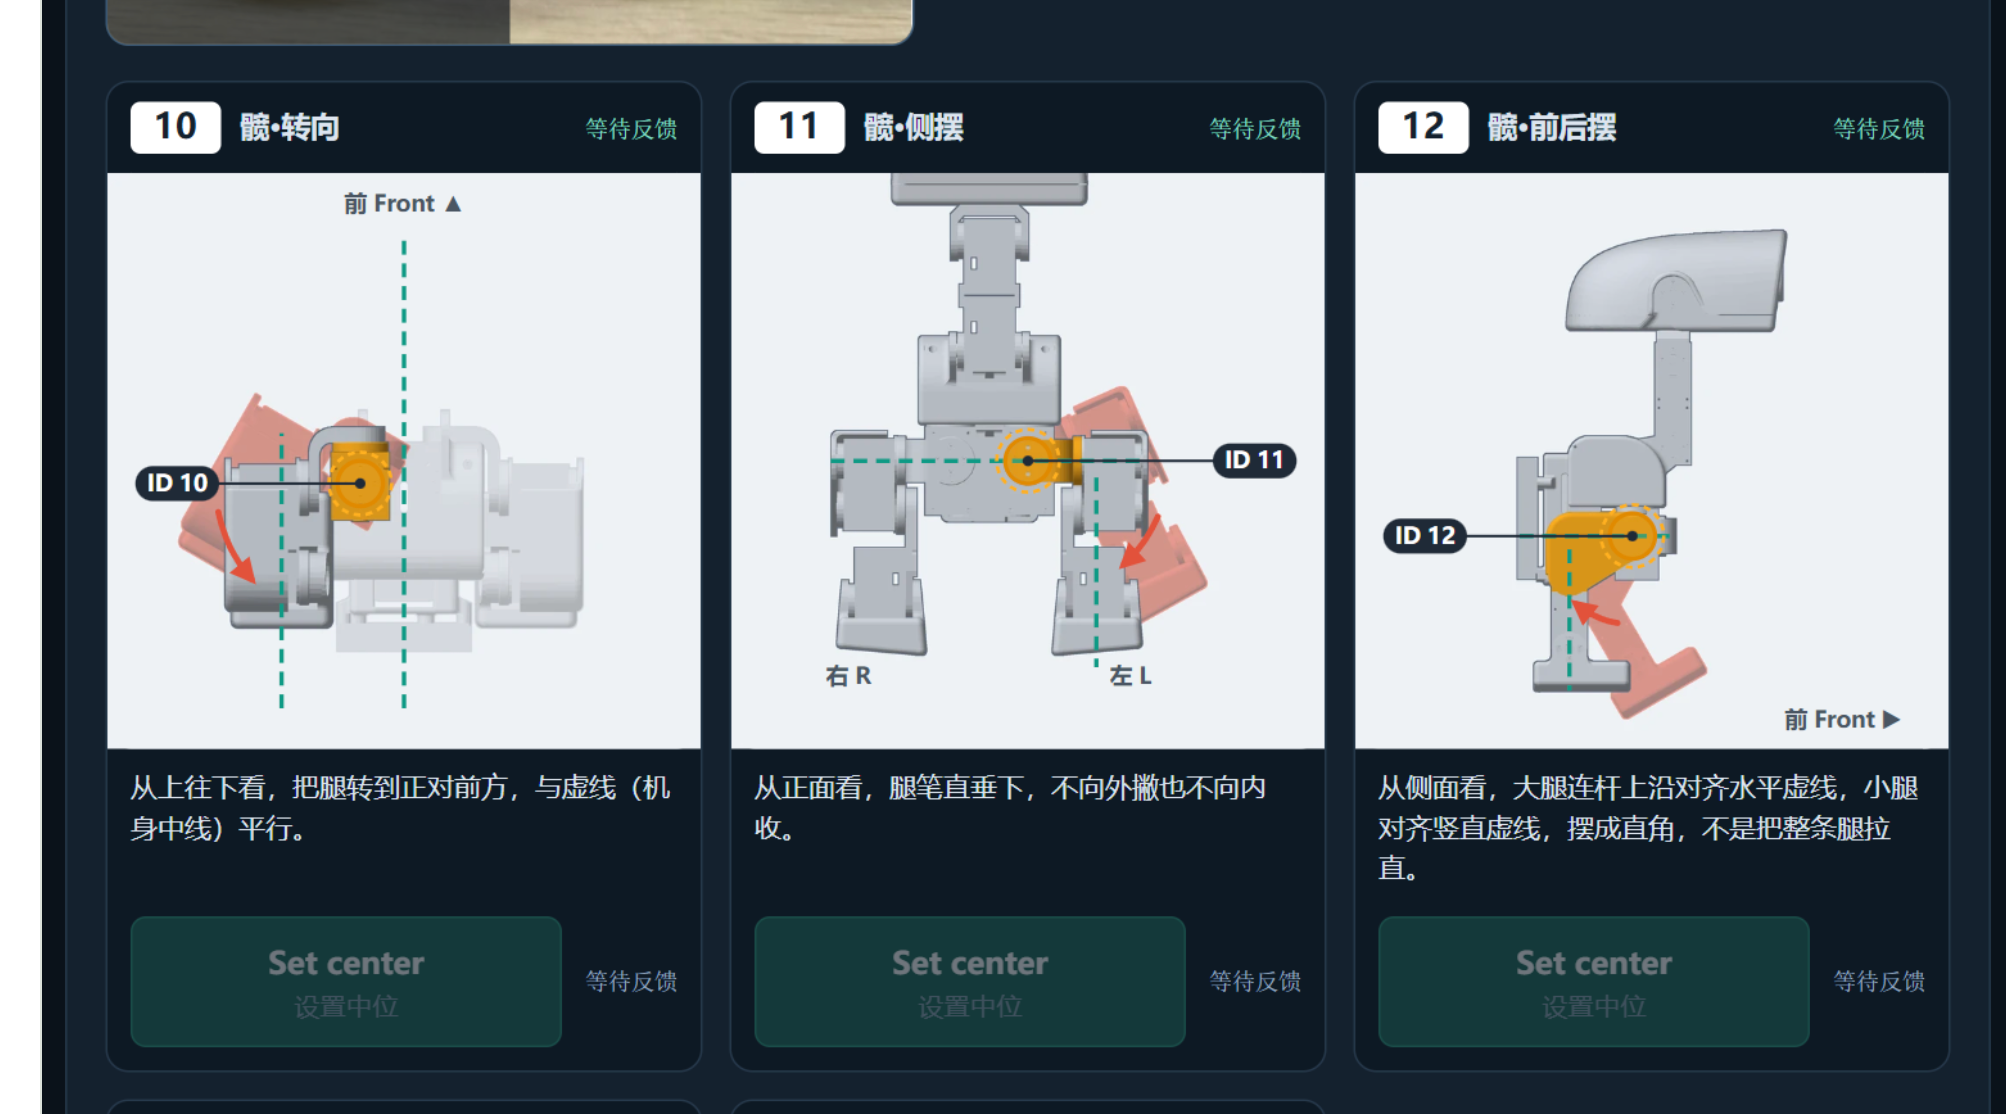
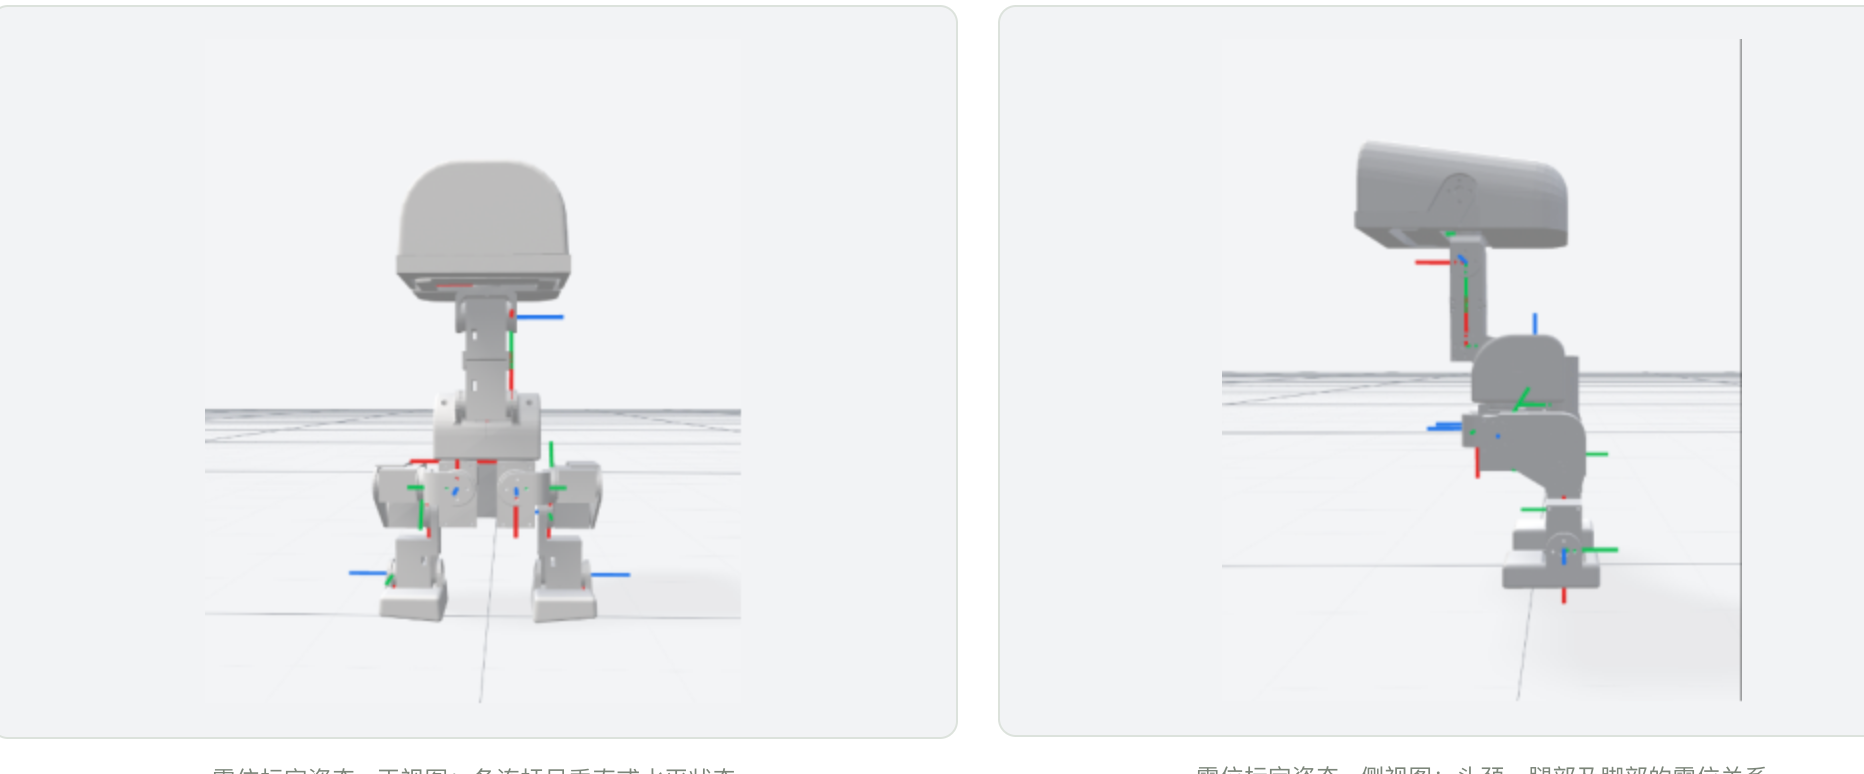
Calibration pose in 0.3.6: the updated procedure is simpler and more stable, with better results in testing. Upgrading to 0.3.6 is recommended.
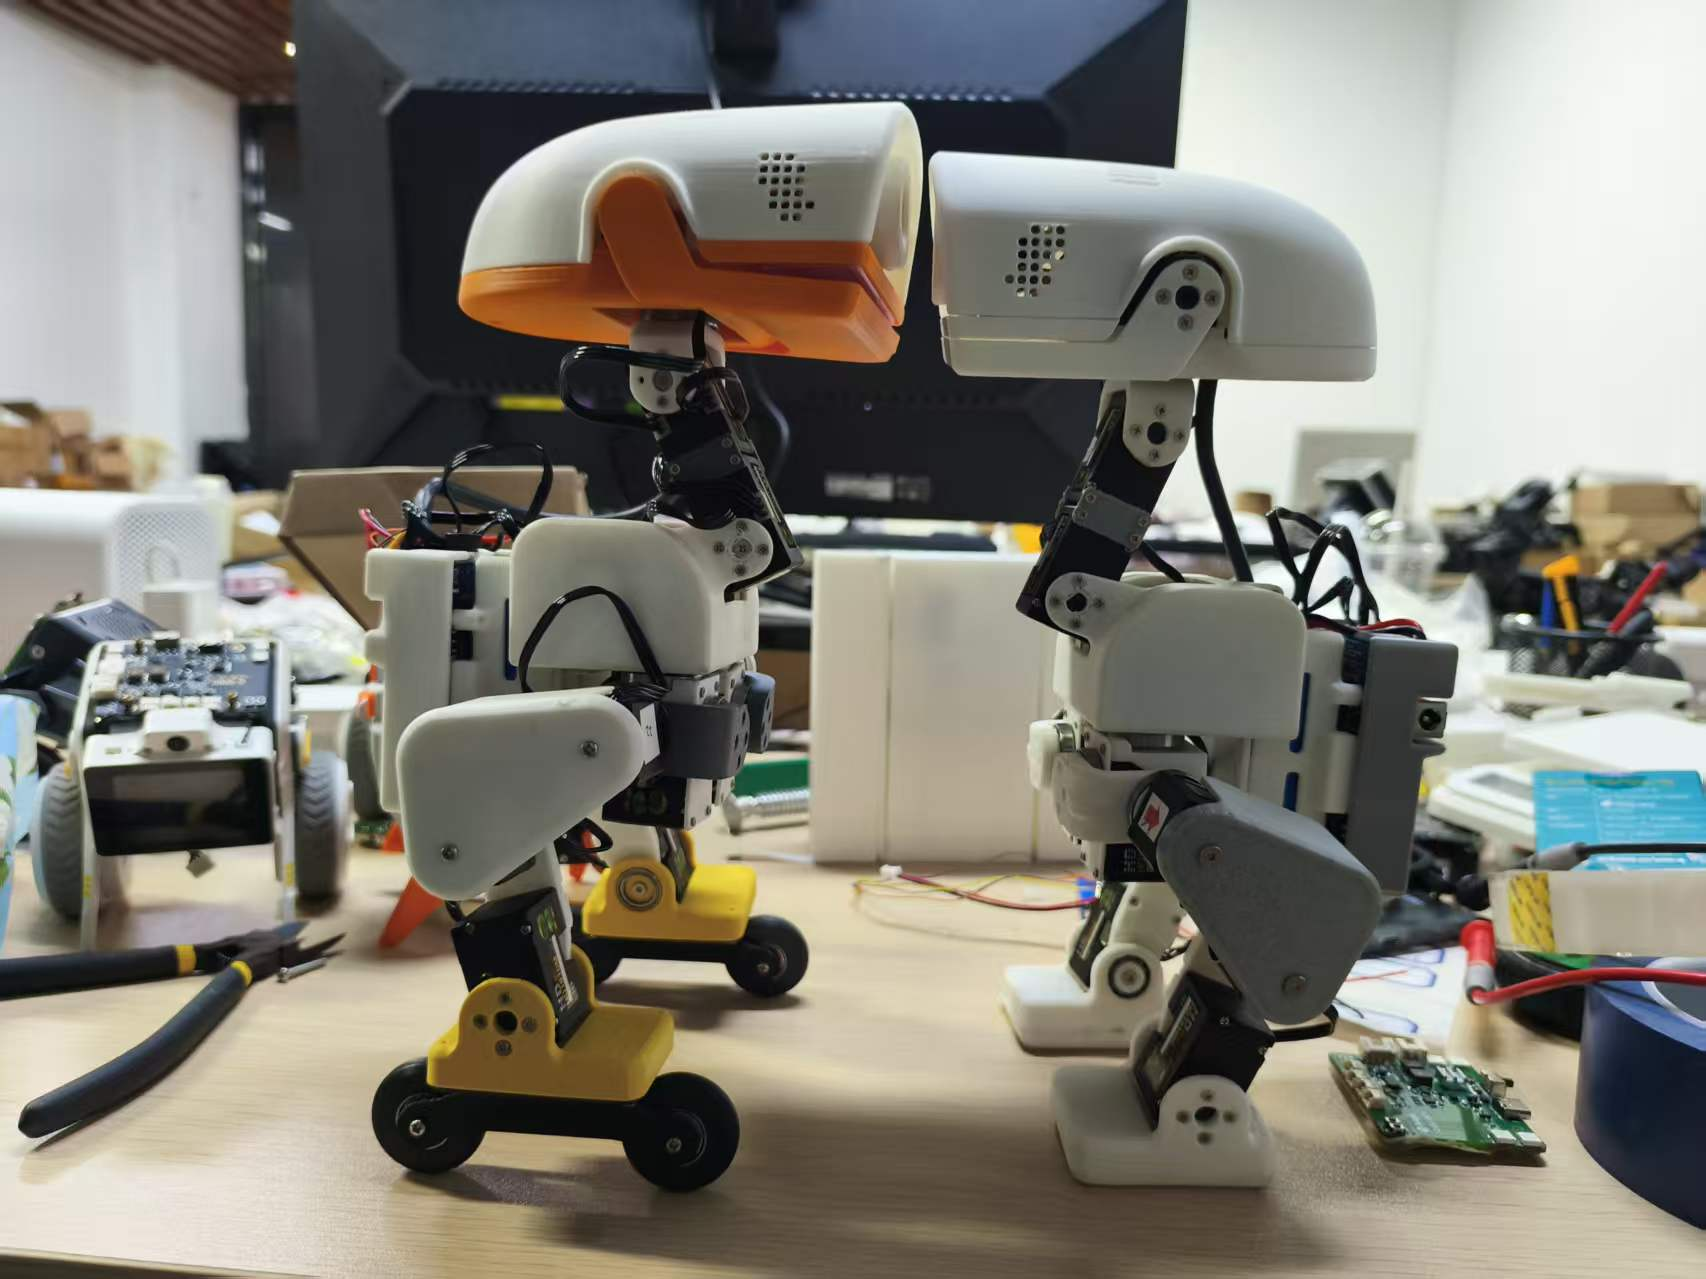
Default Pose: after calibrating every servo, select Default Pose at the bottom of the Calibration page on :9527. This is a standing pose with angled joints, especially at the neck and legs. Compare it with the photo below to spot a joint that was calibrated incorrectly.
See the calibration guide for the complete procedure.
7. All servos go offline after a cable change
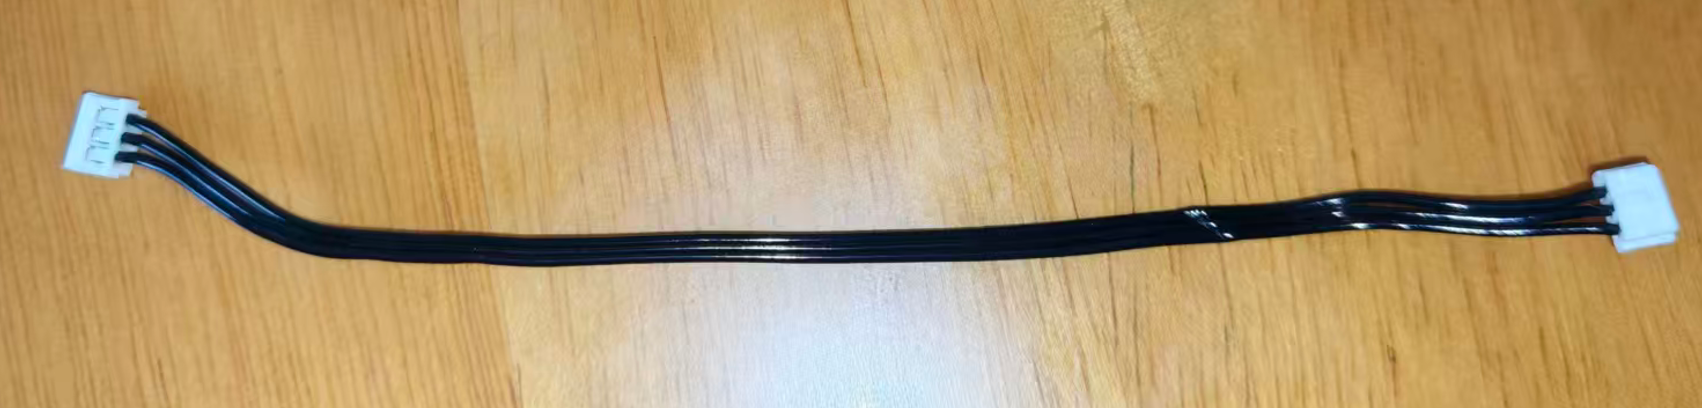
Check the connector orientation at both ends of the servo cable. XGO-Duck uses a cable whose two end connectors have opposite orientations. The wrong cable can take every servo offline. Power off before replacing it.
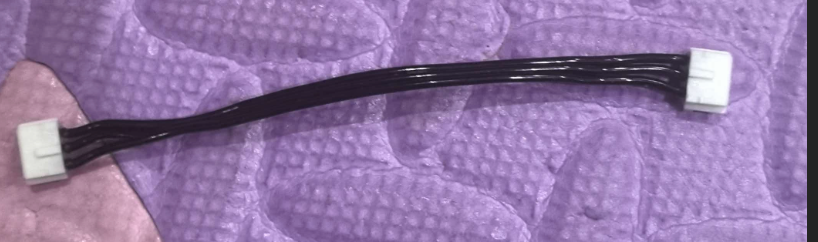
8. The expansion board's power light is off
The battery connector may be reversed. Disconnect power and compare the connector direction with these photos before reconnecting it.
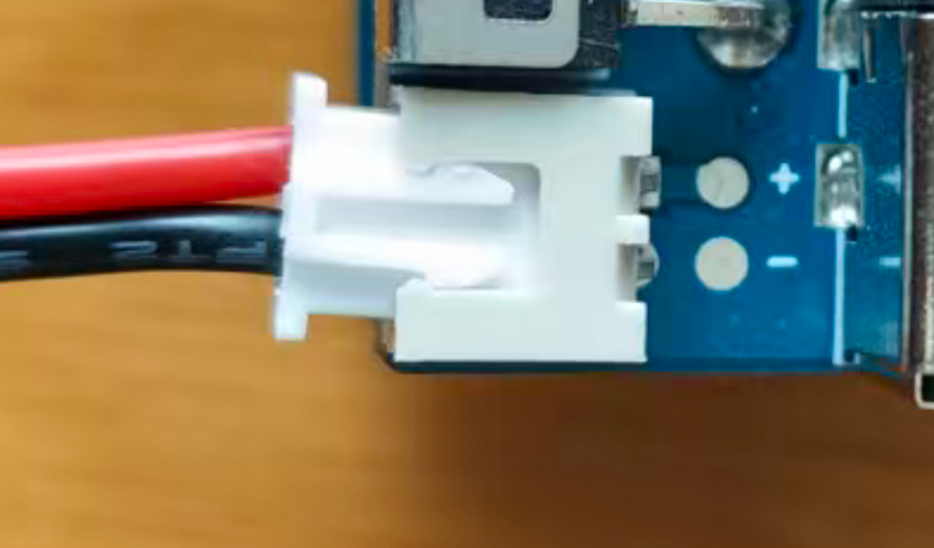
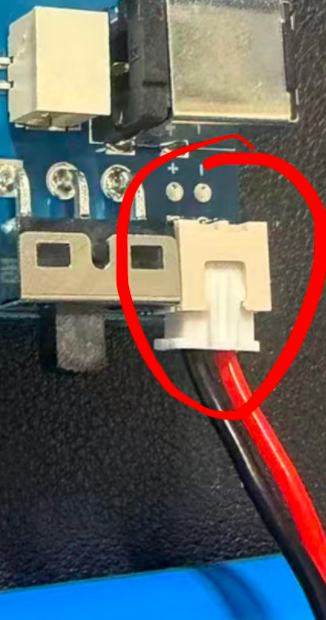
9. The IMU and servos are offline
First check that the expansion board has power: connect the battery or charger. For movement tests, use a charged battery as described in question 3.
10. How do I connect audio/video power on a V1 board?
On the V1.0 expansion board, a two-pin PH2.0 power socket can be soldered directly into the 5V and GND holes shown below.
Power off and disconnect the battery.
Match the socket pins to the 5V and GND holes. Adjust the pins to the actual hole spacing before soldering.
Check for solder bridges and verify polarity before reconnecting power. Looking into the socket opening as shown in the inset: left is 5V (+), right is GND (−). Confirm the pin-to-hole mapping before soldering.
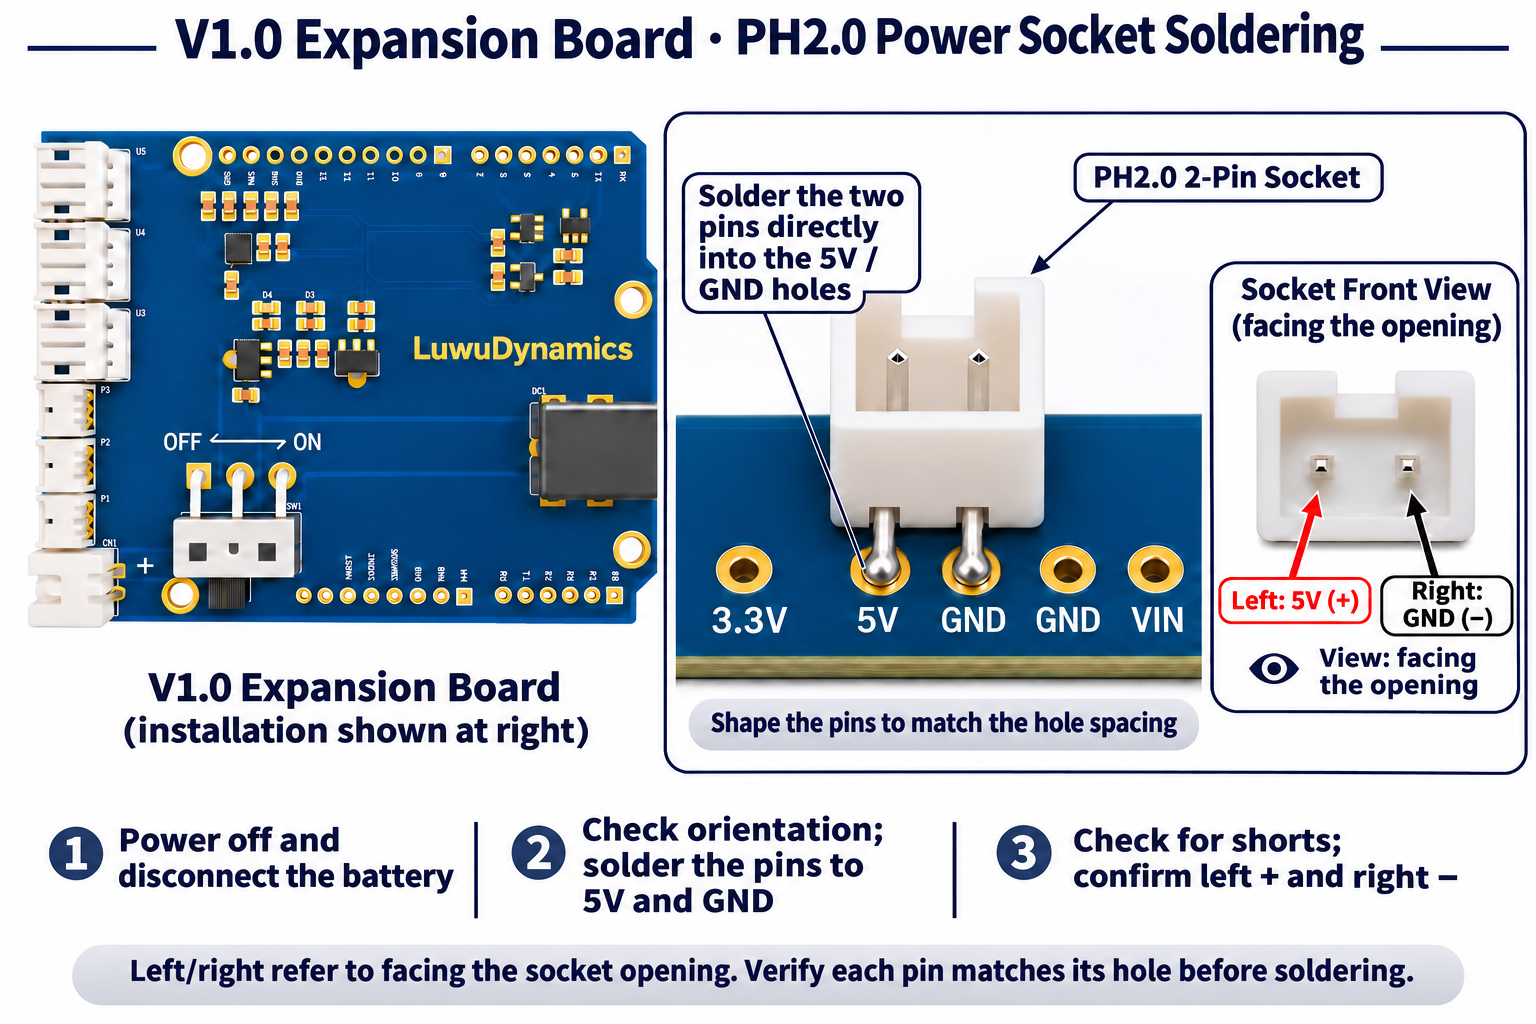
Video: soldering the power socket directly to the V1.0 expansion board
The demonstration is about 1 minute 14 seconds long. Use full screen to inspect the solder joints and wiring. For the remaining module connections, see 05 · Assemble the robot and wire audio/video.
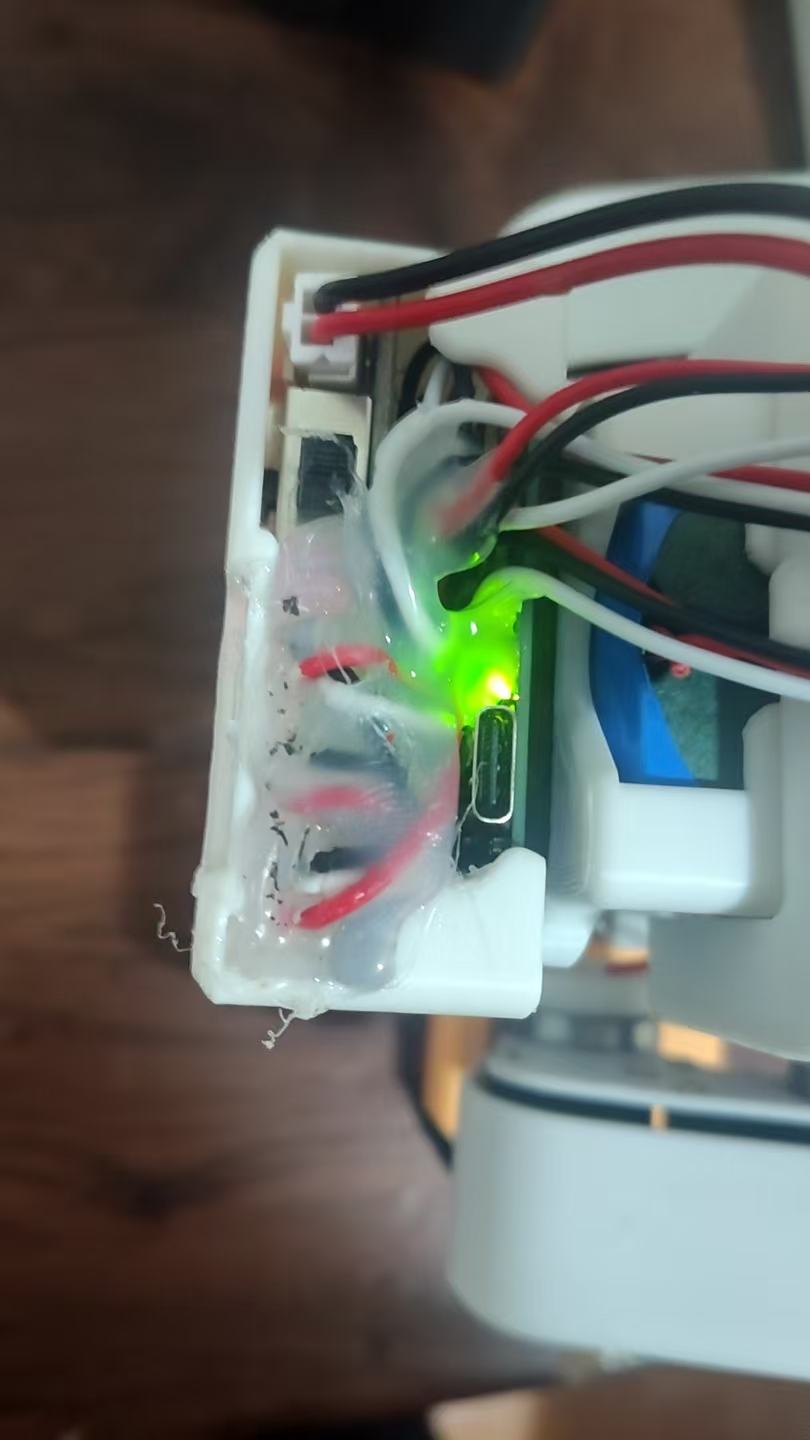
11. Servos go offline when sitting down or standing up
Check for loose servo cables. With power disconnected, reseat the connectors. Hot glue at the servo connector can help keep the cable secure, as shown below.
12. How do I train a motion policy?
Start with the official xgoduck_rl repository. You can give this repository link to an AI coding assistant for help with its setup and training instructions. The Wiki's training, playback and export guide explains the workflow.
Other problems
| Symptom | Check first | Next action |
|---|---|---|
| The page shows old content | Browser cache | Press Ctrl + F5 to force a refresh. |
| A servo is offline | Power, connectors, cables and IDs | Scan in Servo setup. If needed, connect only the affected servo to isolate the problem. |
| Two servos respond together | Duplicate IDs | Connect one servo at a time, assign its ID, and label it. |
| Default Pose is stuck or misaligned | Joint IDs, left/right assembly, centers and cables | Support the body and unload the servos. Compare the mechanism with the assembly and calibration instructions. |
| A servo shakes or becomes hot | Calibration, mechanical drag, gains and power | Stop motion. Resolve mechanical and wiring problems before adjusting settings. |
| The IMU is offline | Expansion board, connection and power | Check the matching board schematic and runtime diagnostics. Do not guess the wiring. |
| The robot resets during movement | Power under load and connectors | Stop repeated retries. Check the battery, wiring harness and power path. |
| There is no Bridge feedback | The App and arduino-router | Stop the App in App Lab, restart the Router using the command below on UNO Q, then run the App again. |
| Neither browser entry opens | Current board IP, local network and App status | Confirm that the App is running. The IP address can change after reconnection. |
| 9527 opens, but the cockpit does not | Audio/video support installation and cockpit service | Check that tools/install-ai-support.sh completed and inspect the cockpit service. |
| The USB link disappears during installation | USB Host probing and the board's USB role | Continue diagnosis over Wi-Fi SSH and record the actual failure before retrying. |
| No camera image or light | USB/light connections, board firmware and device status | Reopen the preview after idle release. Test the light separately. |
| No sound, no microphone, or device busy | Speaker plugs, microphone, volume and active recording | Test speakers and microphone separately. End monitoring or recording before voice chat. |
| ToF is offline or distances are frozen | 3.3 V power, Wire1 and the cable | Check state=ranging, fresh=true, increasing seq and valid_zones > 0. HTTP success alone is not enough. |
| The gamepad is paired but cannot move the robot | Live input, mapping and centered sticks | Explicitly enable control after reconnection. Pairing does not enable motion. |
To restart the Router after stopping the App, run this command on UNO Q:
sudo systemctl restart arduino-routerThis service restart resets the STM32. Run the App again so the firmware and connections reload. Confirm feedback and unloaded status before selecting a motion mode.
If startup repeatedly downloads an already installed toolchain, run the following in the actual existing App directory on UNO Q, then retry. Keep valid caches; do not run it from a guessed duplicate installation.
python3 tools/reuse-toolchain.pyPrepare a useful support report
Record the hardware and expansion-board versions, servo model, runtime version, power setup and actual App installation directory.
Describe the steps that reproduce the problem, which page or component fails, and the relevant status or error log.
For movement faults, include battery charge, affected servo IDs, gains/protection readback and calibration results. For assembly faults, include clear photos of the wiring and mechanism.
For audio/video faults, report which individual component tests pass. Remove passwords, tokens and binding credentials before sharing logs publicly.
Routine care
Power off before changing cables. Inspect connectors, fasteners, joint travel and cable slack after impacts or reassembly. Keep printed parts and electronics dry. Back up the App and device data before updates, and repeat calibration after changing a joint or structural alignment.