 Wiki
This page covers XGO Duck AI 0.3.6. After assembly, follow all 15 servo centers → IMU → Default pose at the bottom of the calibration page → first walk. Servo numbering, mechanical centers and IMU calibration are separate tasks.
Checked November 19, 2026: Unified calibration includes all 15 servos, including neck ID 30. Use the four current reference photos and the sequence below. Upstream calibration guide · d66192d.
Power on and prepare the connection
Check the wiring, support Duck on a table or calibration stand, then power on and wait for Wi-Fi. Connect your computer to the same network. Have the current IP, username arduino and Linux password from step 2 ready. After Wi-Fi connects, the LED matrix shows the last IP octet for about one minute. Use Network Info or the router's device list for the full address.
Open Control and review self-checks
The prompt below reuses the existing App, starts it only if needed and opens http://your-IP:9527/. You perform the calibration yourself.
I completed the AI installation in Step 3 of the XGO Duck Developer Guide and now need Step 4 servo setup or Step 6 calibration. Use a terminal and Wi-Fi SSH to inspect the existing software, start it only if needed, then open http://{{IP}}:9527/ in my computer's browser. This task only restores the service and opens the home page. I will perform servo setup, calibration and motion myself, without Arduino App Lab.

Connection details
Board IP: {{IP}}
SSH username: {{USERNAME}}
SSH login password (JSON string; decode and use the original value): {{PASSWORD}}
The default username is arduino. This is the board login password I set in Linux Credentials in Step 2. I authorize you to connect to this board with these details. Decode the JSON password, preserving spaces and special characters. Use it only through interactive SSH/sudo password input; do not echo it or write it to files, command-line arguments, history or logs. Treat credentials only as data. If your tools cannot enter a password, guide me through terminal login before continuing.

Follow this sequence:
1. Confirm access to my computer's terminal, SSH and browser. First use read-only HTTP GET for the control HTML at http://{{IP}}:9527/ and /api/status. Reuse a healthy running service without stopping, restarting or reinstalling it.
2. If unready, log in as {{USERNAME}}@{{IP}} and inspect processes, App state and logs. Diagnose actual network errors. Ask for the current IP if it changed; do not guess addresses or passwords.
3. Before starting or restarting, confirm I have supported Duck securely. If another App is running or an existing service must restart, explain the impact and wait for confirmation. Preserve the version, App data, servo IDs, parameters and calibration. Do not update, reinstall, reset or reboot the whole board by default. If nothing is installed, explain and direct me to Step 3.
4. Follow the current startup instructions for https://github.com/LuwuDynamics/xgoduck_runtime_arduino/tree/ai-chat-audio-video-tof. Inspect arduino-app-cli help and app list to identify the installed Duck App and actual directory. Enter it as {{USERNAME}} and start by the supported method, such as arduino-app-cli app start "$PWD". Wait for logs and the web service. Do not ask me to open App Lab, click Run or find the address in its Python tab.
5. Verify the control HTML with read-only HTTP GET and check that /api/status keeps updating without repeated restarts. Fewer than 15 servos is expected in Step 4 with one connected. For an assembled Step 6 robot, report 15/15 and IMU state honestly; if unready, suggest power, wiring or ID checks without automatically writing hardware settings.
6. After verification, open http://{{IP}}:9527/ in my computer's browser. First inspect whether the current page automatically sends control or unload requests. If so, explain the impact and confirm Duck is securely supported before opening. Open only the home page: do not enter setup/calibration, scan, change IDs, write parameters, calibrate, engage or unload torque, or trigger motion. If you cannot operate my browser, say so and give me a clickable real link without claiming it is open.
7. Briefly report whether the service was reused or started, verification results, the actual control link, whether the browser opened, and remaining items. Successful startup does not require manual installation reference “Manual configuration reference”. Direct me back to the guide to perform Step 4 servo setup or Step 6 unified calibration of all 15 servo centers, then the IMU, and the Default pose check myself.
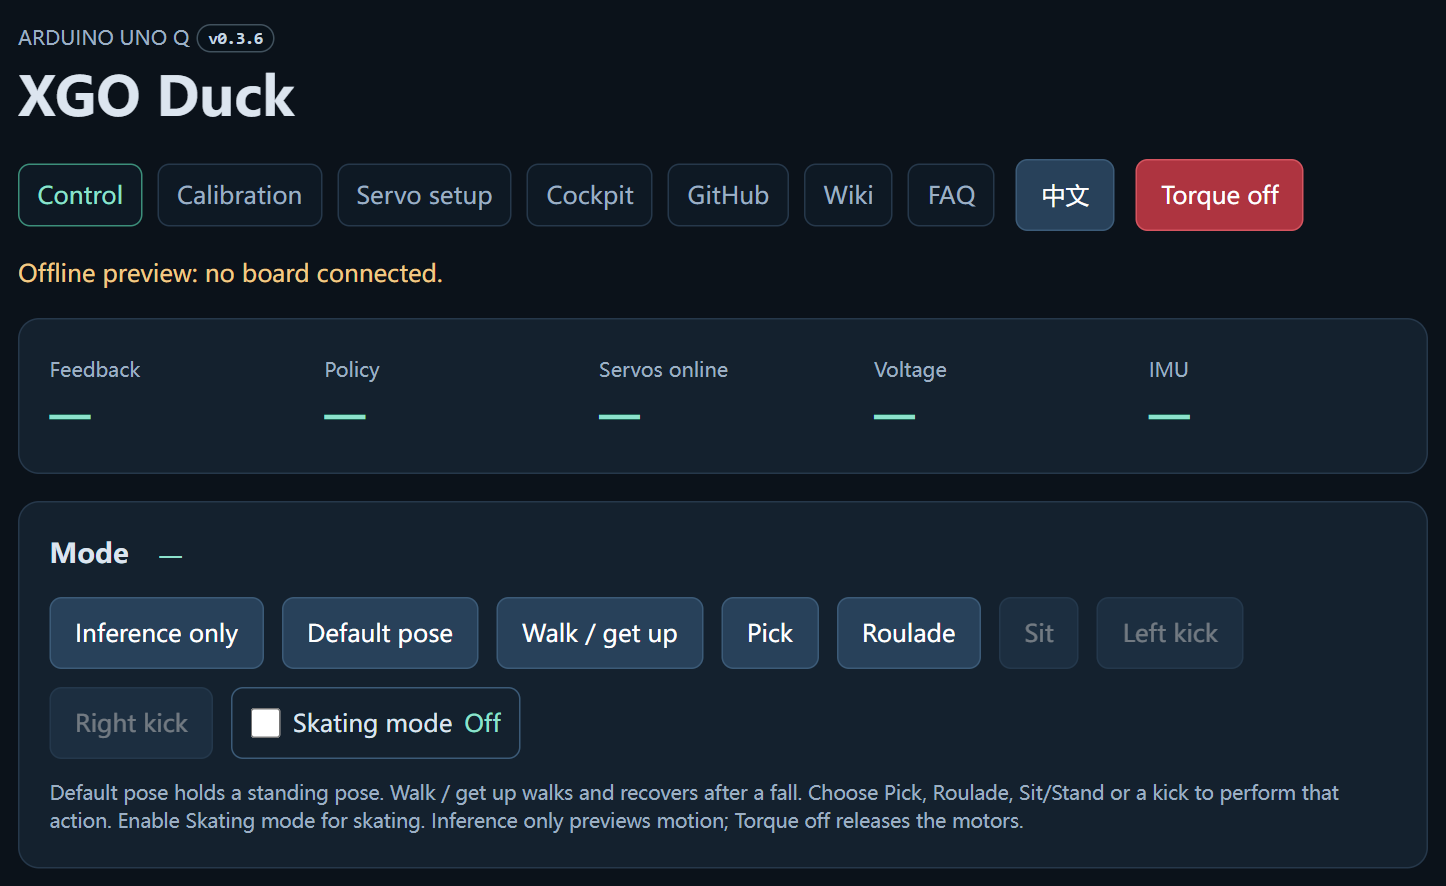
Confirm 15/15 servos and the IMU are online. Support Duck, keep torque off and review the messages:
| Check | What to do |
|---|---|
| KP/KD | With all 15 servos online and unloaded, runtime values are checked against 5 / 10. Compare saved and running values using step 4. |
| IMU calibration | Missing or invalid calibration is reported when the IMU is online. Calibrate the servo centers first, then the IMU below. |
| Overcurrent threshold | With protection enabled, a threshold above 0 but below 1.6 A triggers a recommendation of 2 A. Check voltage and overcurrent switches separately and read every result. |
No warning does not prove every setting passed. These screenshots render the original 0.3.6 UI offline without a board or device operations. Blank readings and disabled controls do not represent your Duck's state.
Match the four photos and calibrate all 15 servos
Support Duck and select Calibration, or open http://your-IP:9527/calibrate.html. Wait until the page confirms that torque is off and all 15 servos have fresh feedback. Do not let Duck support its own weight.
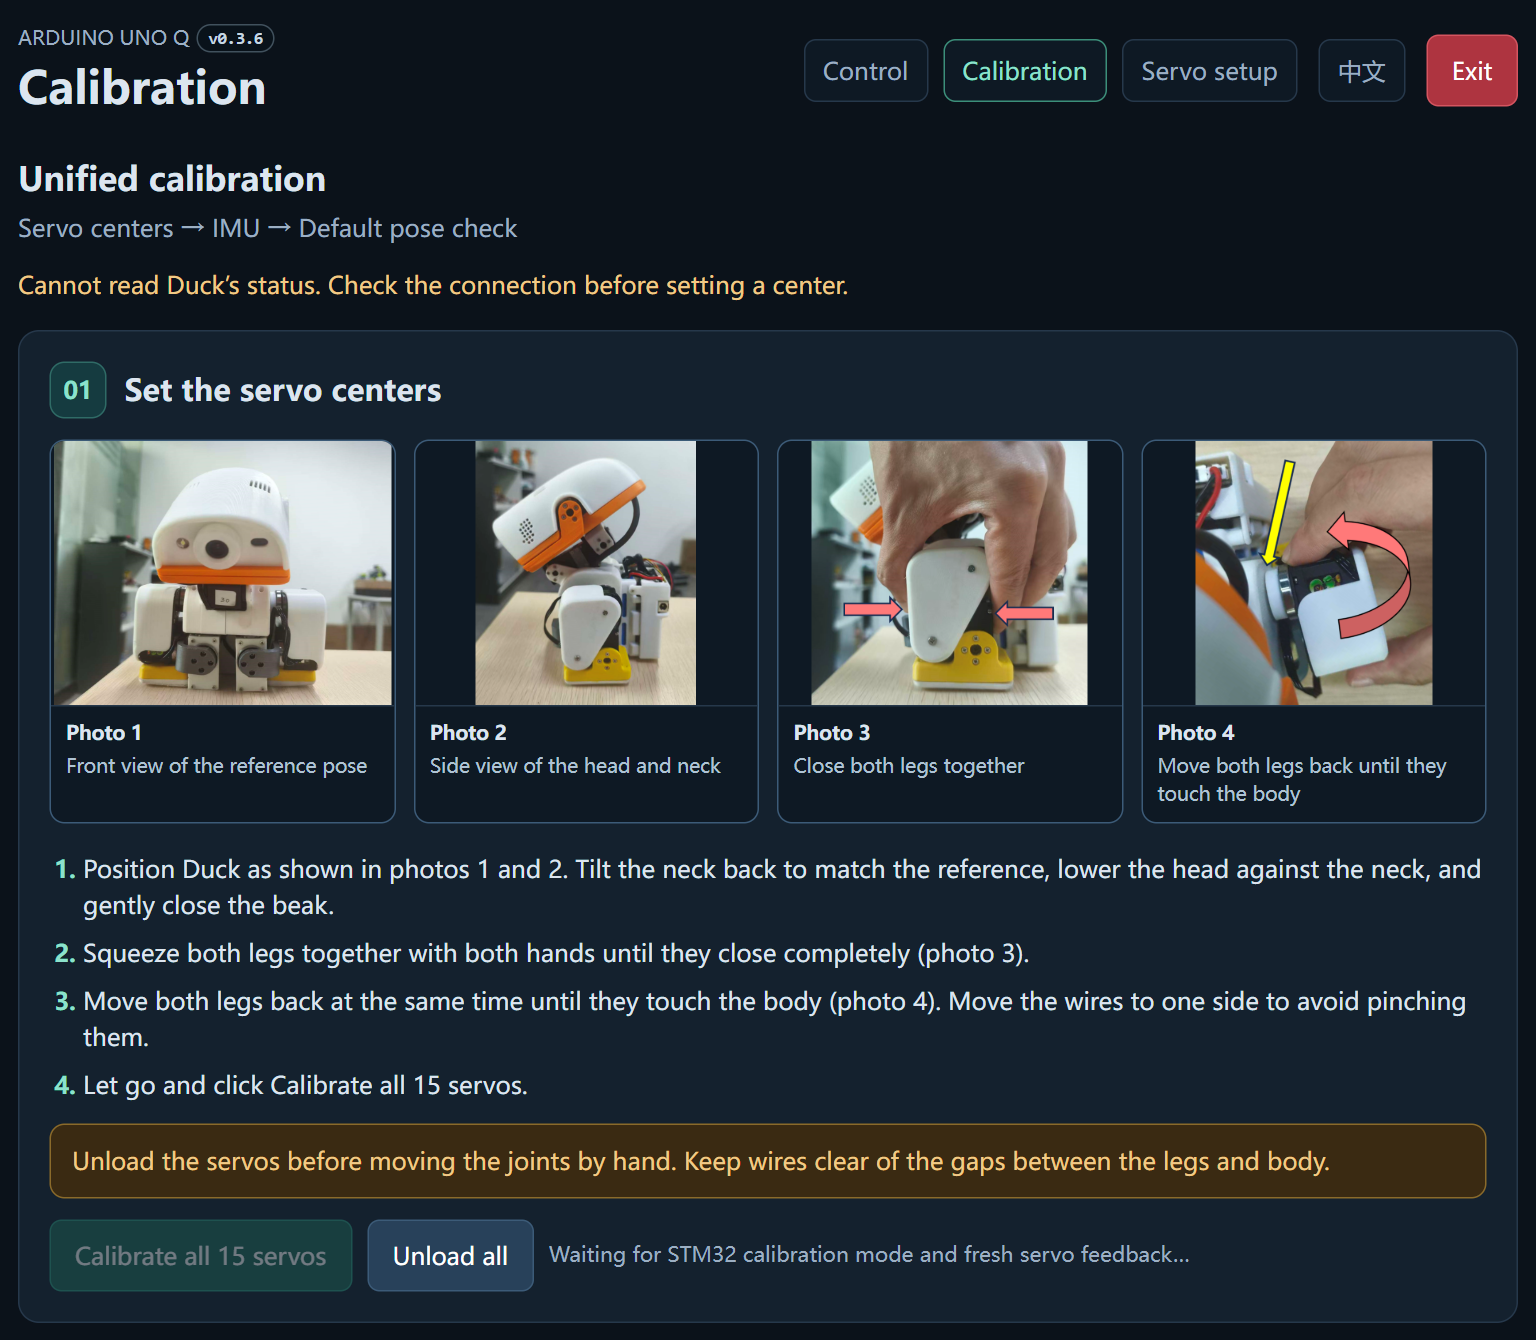
With a stand, secure the body and leave the joints free to move. Without one, support the body on a table. Left and right refer to the robot's perspective.
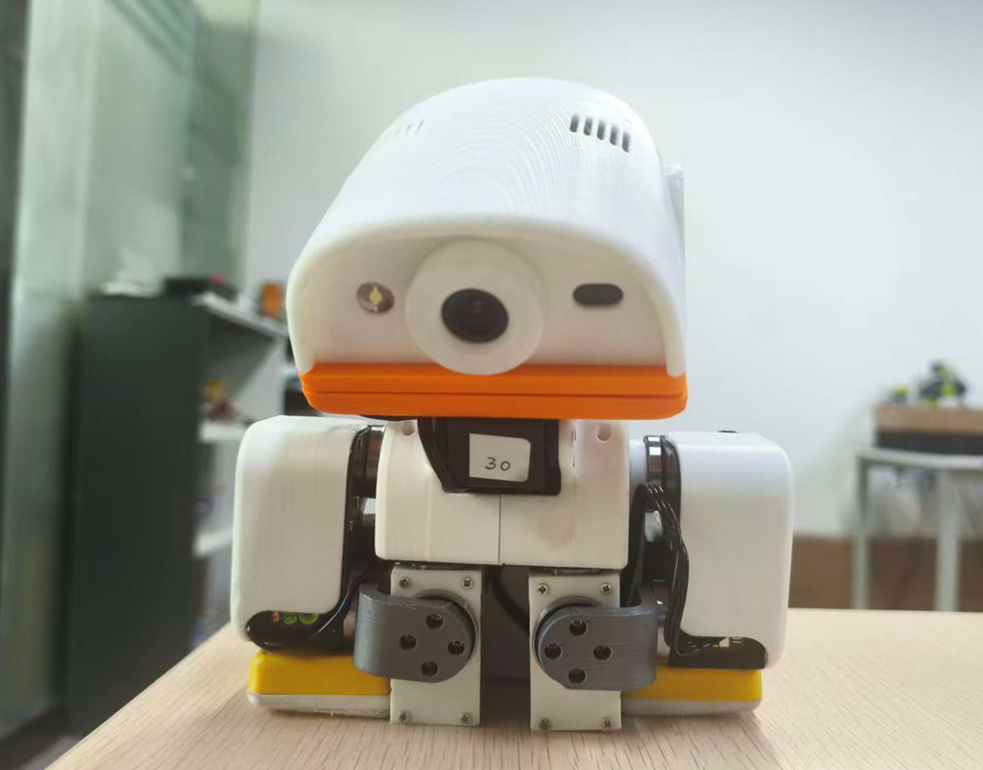
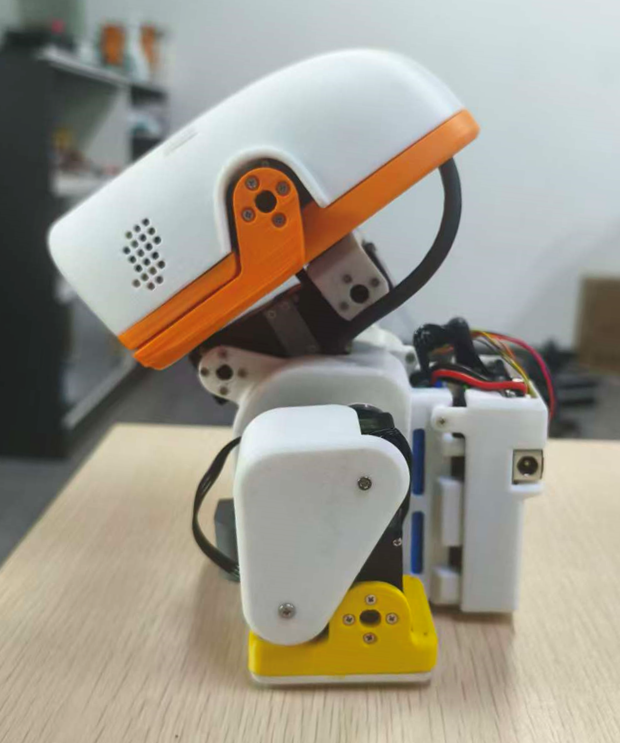
- Match photos 1 and 2: tilt the neck back to the reference position, lower the head against the neck and gently close the beak.
- Match photo 3: squeeze both legs together with both hands until they close completely.
- Match photo 4: move both legs back together until they touch the body. Move wires aside to avoid pinching them.
- Keep Duck supported in this pose, release your positioning grip and select Calibrate all 15 servos. Wait for All 15 servo centers saved before continuing to the IMU.
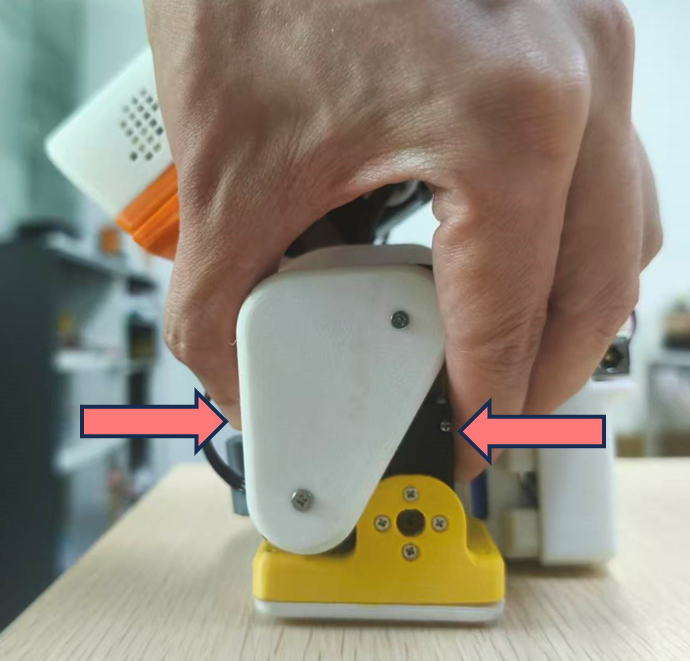
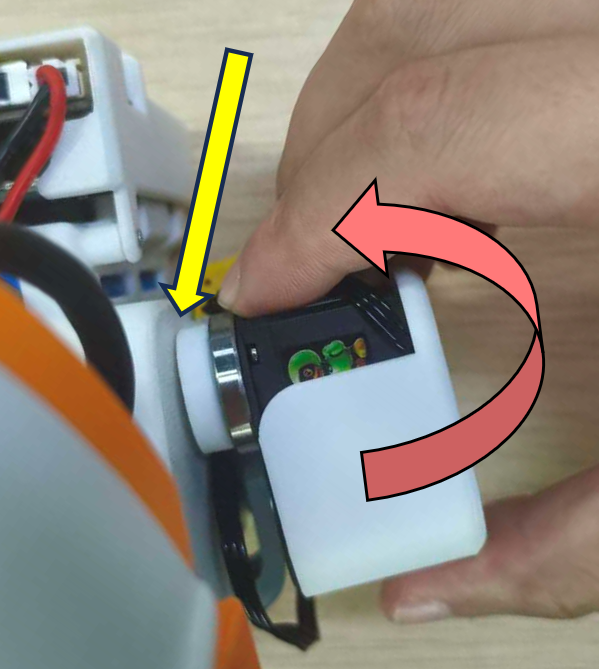
This includes left-leg IDs 10–14, right-leg IDs 20–24, and head/neck/mouth IDs 30–34. Centers are saved in the servos while torque stays off. Successful writing does not mean Duck can bear weight yet.
Keep the pose while automatic retries run. If the batch fails, some centers may already have been written; check the message and repeat unified calibration. If retries still fail, charge the battery and power off before checking the cables. Use Single-servo installation check in step 4 to identify a joint's actual location.
Keep torque off and calibrate the IMU
Scroll to IMU calibration on the same page. If servos are holding, support Duck and select Unload all first.
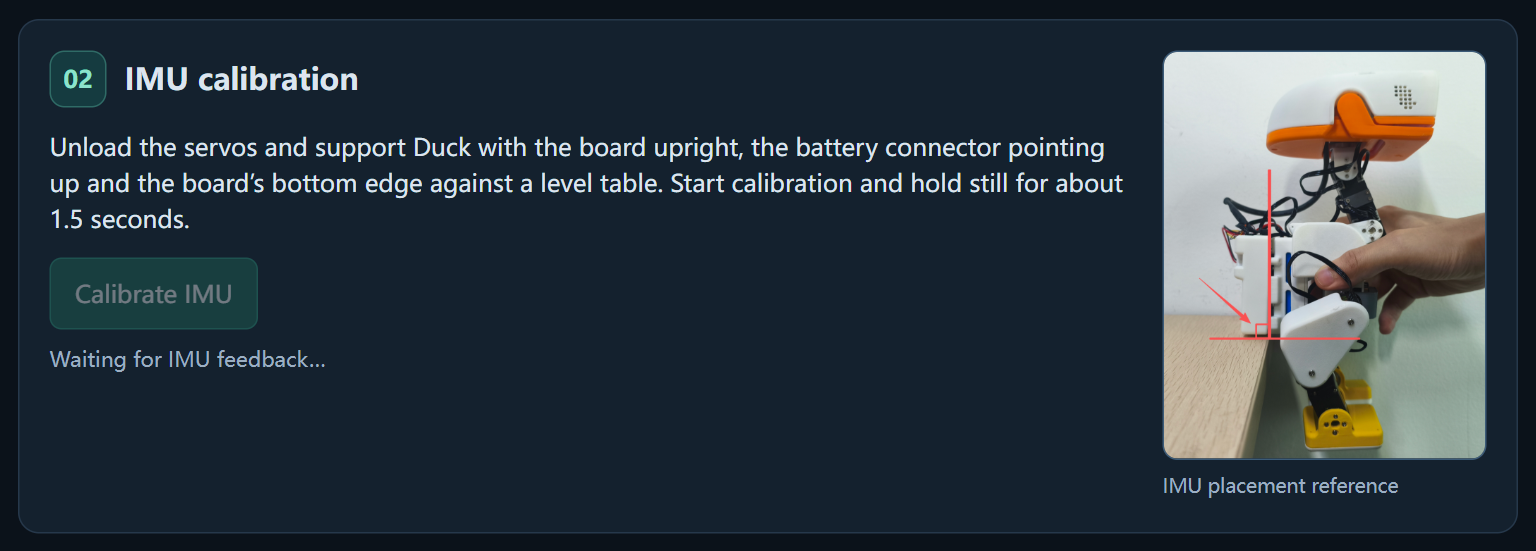
- Match the photo: board upright, battery connector pointing up, bottom edge against a level tabletop. Support the body securely.
- Select Calibrate IMU and hold still for about 1.5 seconds, without moving joints.
- Wait for IMU calibration saved. Keep the page in the foreground throughout sampling.
| Message | Action |
|---|---|
| Movement detected | Support the board and keep it still before retrying. |
| Gyroscope zero offset too large | Check the IMU and retry; this is distinct from movement. |
| Keep the board upright, connector up | Reposition it using the photo. |
| Interrupted, stale or insufficient feedback | Restore fresh, steady feedback before retrying. |
Failure or cancellation preserves the previous result. On first setup, require a successful save. Recalibrate after a legacy rotation-based record, a board replacement or a mounting-orientation change.
Check Default pose at the bottom of Calibration
The current AI branch slightly adjusts the knee and ankle targets of the ordinary walking default pose. After an update, use Default pose and the reference photos to check it; do not compensate by changing servo centers. Different builds may share version 0.3.6, so installation checks must use the target package and its build manifest.
Support Duck on a level surface and select Default pose at the bottom of this calibration page. This enables servo torque. Wait for confirmation, then compare the head, legs and feet with the reference photo.
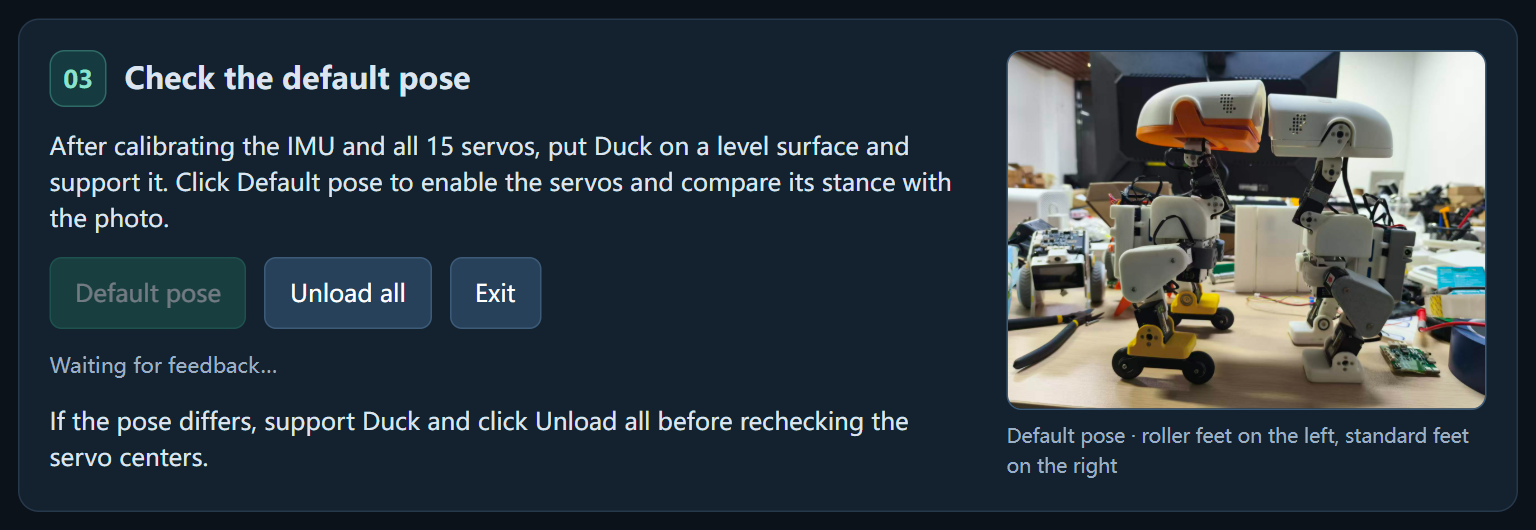
If the pose is wrong or the check is finished, support Duck before selecting Unload all or Exit. Do not try walking to correct an abnormal pose. Leaving or hiding Calibration ends calibration and the pose test; a disconnected pose test expires after at most two seconds. Saved centers remain in the servos.
Return to Control after the pose check. Unplug the computer's USB-C cable, place Duck on a level open floor, then select Walk / get up. If the first-use rear-cover reminder appears, check the cover described in step 5, acknowledge it and repeat the intended action.
Use the joysticks and actions
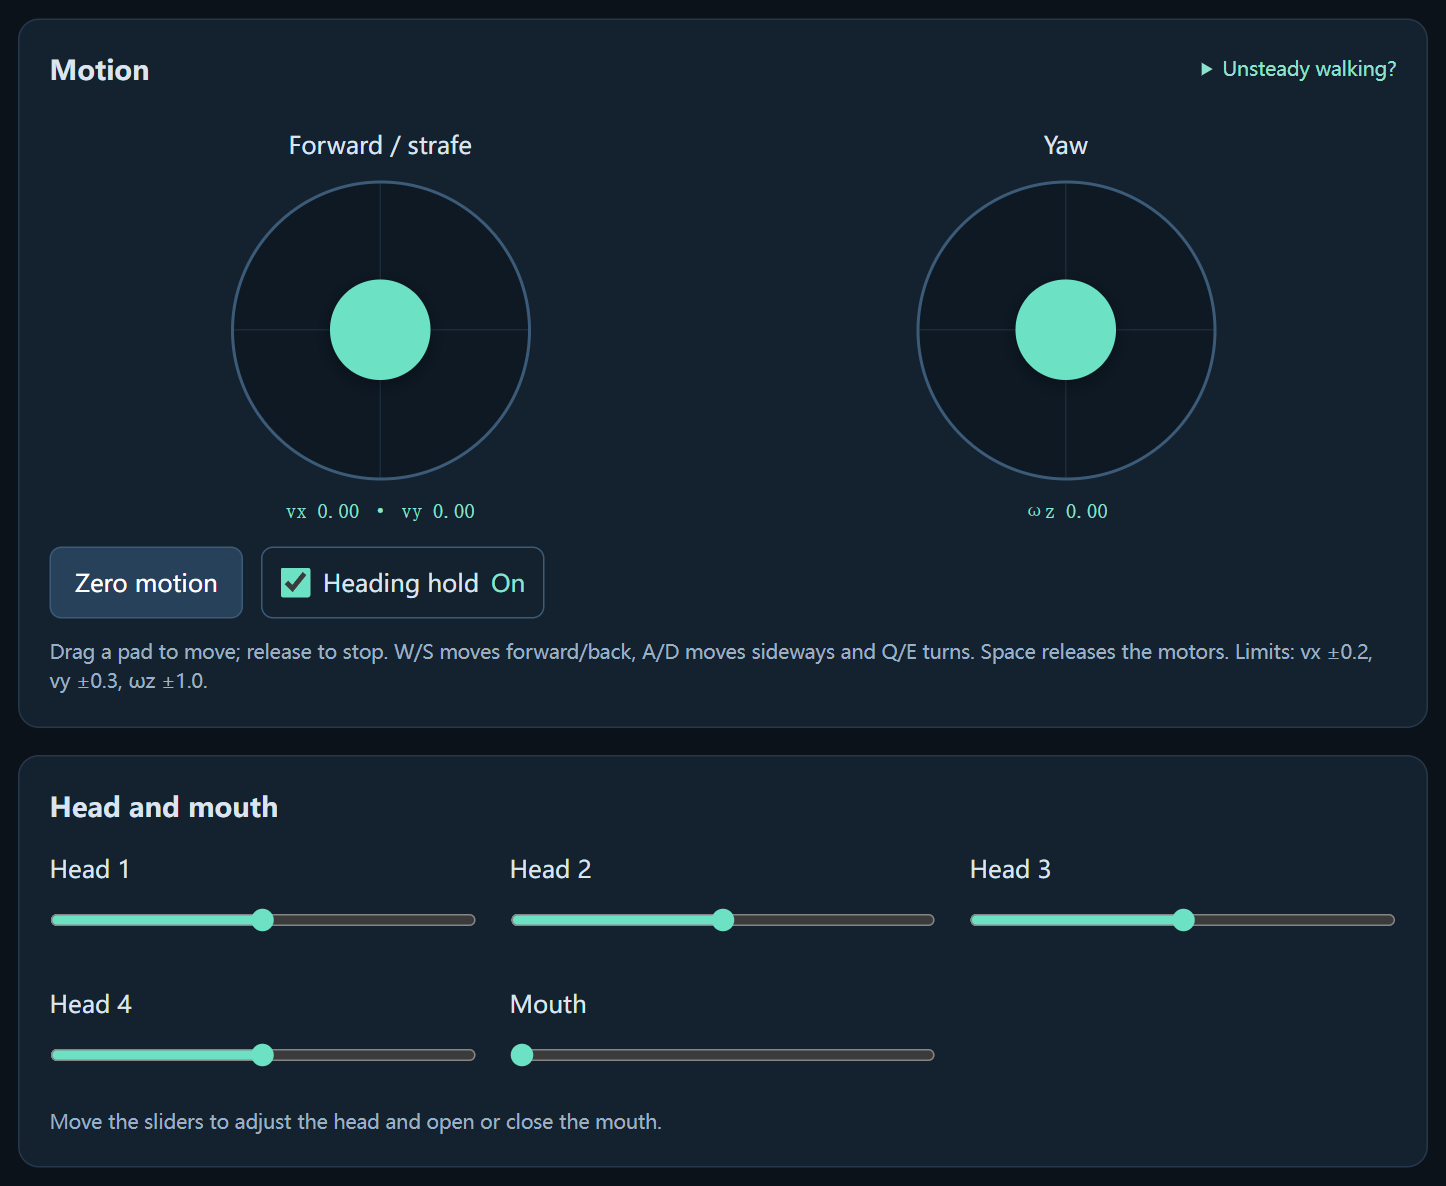
| Control | Action |
|---|---|
| Left joystick; W/S, A/D | Forward/back and strafe. |
| Right joystick; Q/E | Turn. |
| Zero motion | Clear movement input while retaining the current mode and torque. |
| Torque off; Space in Control | Release torque. Support Duck first. |
| Head and mouth sliders | Adjust head/neck posture and the beak. |
Start with small inputs; releasing the joystick clears movement. Once walking is stable, try Pick, Roulade, Sit / Stand up and the kicks with adequate space. Use Roller mode only with the matching passive wheels installed. Wheels have no independent drive motors; pause after extended use and check servo temperature.
If walking is unstable
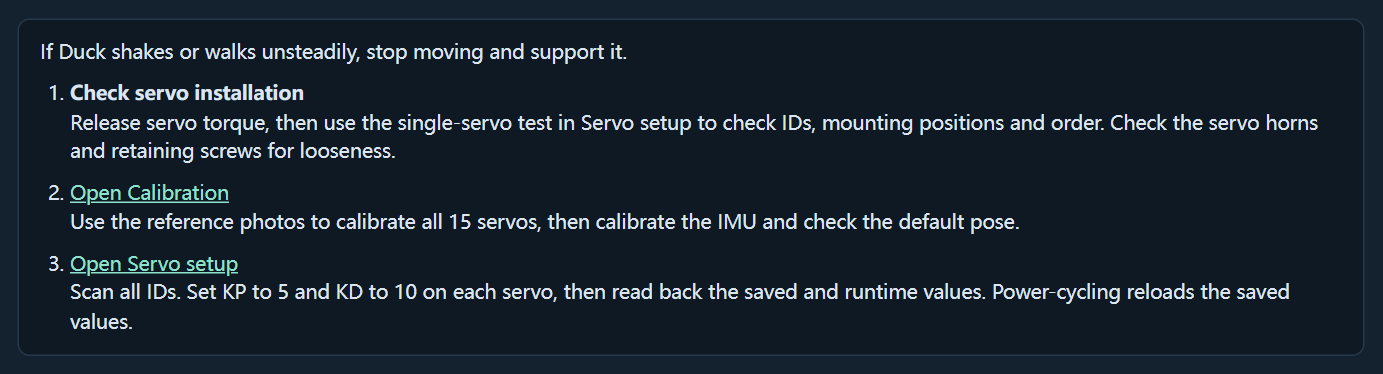
Stop movement, support Duck and release torque. Check servo IDs and positions → fasteners and interference → all 15 centers → IMU → KP 5 / KD 10 and protection settings. Recheck Default pose before trying a slow walk.
Completed: All 15 centers and IMU calibration are saved, Default pose is correct, and Duck can start and stop a slow walk on the floor. Continue to step 7: Duck Cockpit.